Look, I haven’t had a job in years.
Instead of rushing to be at work on time, I have the freedom to live each day on my terms.
Building websites that generate revenue is how I won that freedom.
I’ve learned a ton over the years. What to do. What not to do.
In this post, I’m going to teach you how to build a website right the first time.
We’ll walk together through the entire process. If you follow this post, you’ll have a website when you are finished.
Everything is explained in plain English, so don’t worry if you are not familiar with domains and hosting. I’ve included clear, simple guidance for every possible stumbling block.
The important thing is getting your site up now. It’s the first step on the road to steady income and your new job-free life.
Build Your Website: Two-Minute Quickstart Cheat Sheet
Want to get your website set up in the next hour?
This section is the barebones cheat sheet to help you get set up right away.
Ready?
- You are going to need a web host. I recommend Bluehost because it’s safe, reliable, and costs less than a cup of coffee each month. Plus, readers of my site get an exclusive deal. When you sign up, I highly recommend purchasing the Domain Privacy + Protection to keep your personal information off the public record. It’s an extra cost, but totally worth it.
- Next, you need a domain name. This is where people will find you on the internet, at www.your-domain-name.com. If you sign up with Bluehost, they include a free domain name for the first year, which saves an extra $10-15.
- Finally, download and install WordPress on your site. This is how you will manage all of your content. With Bluehost, WordPress is a one-click install.
See How My Agency Can Drive Massive Amounts of Traffic to Your Website
- SEO - unlock massive amounts of SEO traffic. See real results.
- Content Marketing - our team creates epic content that will get shared, get links, and attract traffic.
- Paid Media - effective paid strategies with clear ROI.
Congratulations! You are ready to start building your website.
Sure, there’s a lot more to do. But now you are on your way to putting in your two weeks and working for yourself.
If you had any issues following instructions in those first three steps, everything is explained in much more detail below. Plus, there are tips for how to edit your site safely and start marketing your business.
Build a Website Step 1: Your Site Needs Somewhere to Live (i.e. Web Hosting)
The first component of building a website is finding a web host.
It might seem intimidating, but it isn’t.
Think of your website as a collection of files. When it’s “hosted” on your computer (like all of your other files), only you can open it.
When you host those files on a web server, anyone can connect to that server through the internet.
Hosting companies offer space on these servers for people’s websites so they don’t have to maintain their own server.
When I’m evaluating different web hosts, there are really three major things I’m looking at: uptime reliability, site speed, and customer service.
- Uptime is how often your website is up and running. If your site is down, people can’t access it, which renders it useless.
- Site speed is super important. People don’t stay on websites that take a long time to load and Google ranks faster sites higher.
- Customer service really matters because websites have issues. They just do. Being able to reach out to expert support and get your problem solved is hard to put a price on.
All of the reputable web hosting providers will have these areas covered, just make sure you aren’t going with a dodgy one.
Bluehost has been around a long time and has a great reputation. You’re not going to have to think about uptime or speed, and 24/7 customer service comes with every plan they offer.
Worry-free hosting is the first reason I recommend Bluehost. It’s $2.95/month and comes with a free domain name, one-click WordPress install, and a 30-day money back guarantee.
To take advantage of the discount simply visit Bluehost and click “Get Started Now.”
That’s going to open up a new page that outlines three different plans. You want the Basic plan. It’s got everything you need to get one website off the ground for an unbeatable price.
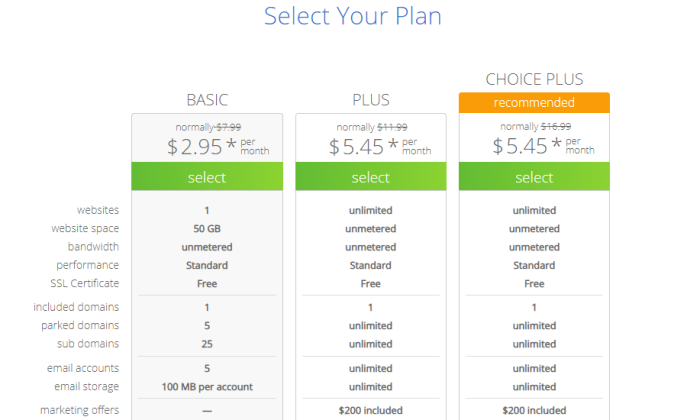
Click “Select” under the Basic plan.
This brings up a new screen that asks you to set up your domain:
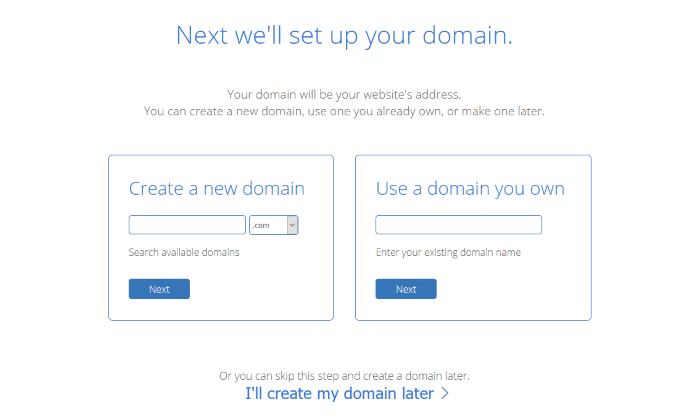
Assuming that you don’t already have a domain, you’re going to need to create one. Bluehost makes it super easy, and we’ll go over creating a new domain name in step 2 below.
So type in your desired domain name if you have it. Otherwise, click “I’ll create my domain later” below the two boxes. This will open a new window where you can enter your information and finish signing up.
After you fill out your information, it will ask you which package you want to purchase:
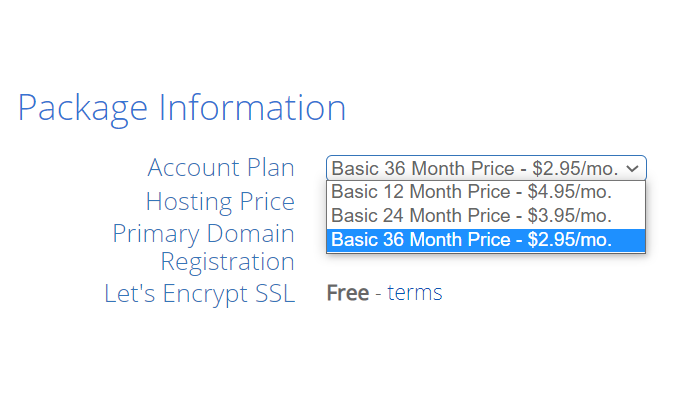
I recommend going with the “Basic 36 Month Price” in order to get the cheapest hosting plan for the longest time. There’s a higher upfront cost than the one-year and two-year plans, but this will save you the most money in the long term.
Below the package information are the various package extras you can choose:
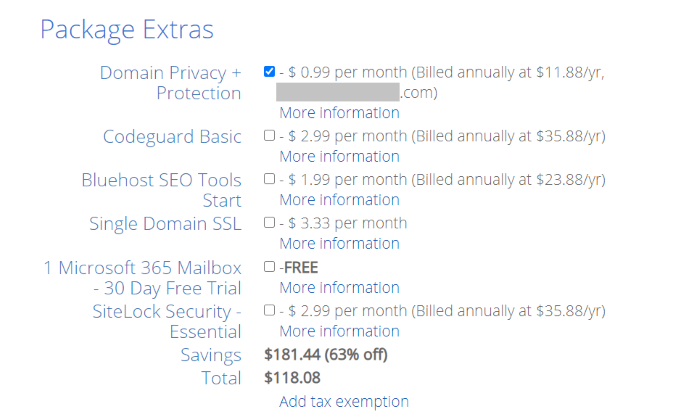
Except for Domain Privacy + Protection, you can disregard this large number of additional items for the time being. Some of them might be checked naturally, so make certain to deselect the ones you don't need.
You need Domain Privacy + Protection since it keeps the individual data you used to enlist your area from turning out to be essential for the openly available report. When the additional insurance is empowered, potential aggressors may have the option to see Bluehost's business data when they look into your area.
From that point onward, add your installment data, check the container that says you've perused the agreements, and snap "submit."
Very much like that, you have a host for your site.
Significant Note: If you choose to complete the Bluehost information exchange process and make your space later, you will not see the Domain Privacy + Protection recorded under bundle additional items. You should update that choice later.
Assemble a Website Step 2: Choose the Perfect Domain Name
In the event that you haven't as of now, it's an ideal opportunity to pick an area name for your site. In this part, I'll walk you through how to pursue an area name with Bluehost.
The hardest thing about picking an area name is observing one to be that isn't taken as of now, so I'm likewise going to share two techniques you can use for concocting a genuinely new thing.
As of now have a few thoughts? Enter your possible space name here to check whether it's accessible:
You need both a web host and a domain name to build a website, so it’s really nice that Bluehost includes a free domain for the first year. You can choose your domain as part of the signup or you can do it later.
When you are ready to create your domain name on Bluehost, type it into the box labeled “Create a new domain.”
You can select other domains besides the ones that end in “.com”. Bluehost lets you get .org, .tech, .io, and others. This is helpful because tons of the .com names are already taken.
When you enter your idea, Bluehost will let you create the domain if it’s available. If not, they will offer suggestions of domains that are available and close to the name you typed.
For example, I tried to create bestmarketing.com, which was already taken. Here are the suggestions from Bluehost:
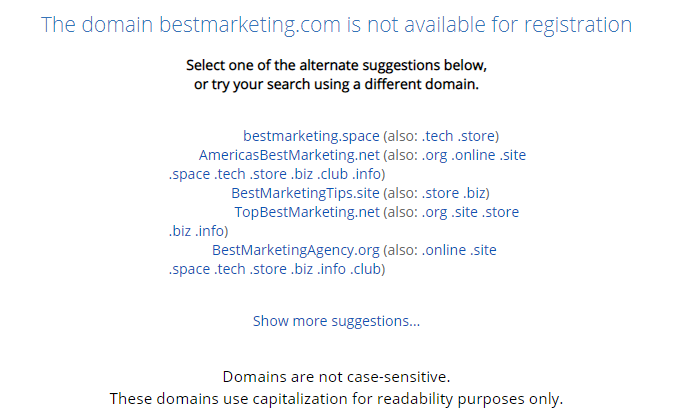
As you can see, there are plenty of options available that are pretty close to what I wanted.
It can take some time to come up with a domain name you like. You want something that speaks to your business, your brand, and your goals.
Don’t overthink it though. While some names might be a bit better than others, it’s ultimately a very small part of your business, compared to the actual content on your website.
Come up with a few names using the following methods, then put them aside for a night and pick your favorite in the morning.
Option #1 – Brute Force Method
If you’re a particularly creative person, you can try your hand at coming up with a great domain name by yourself, off the top of your head.
This was much easier years ago, when fewer good domain names were taken, but it’s still possible if you get creative.
Pick any domain name registrar (where you can purchase the domain), and then search for the domain names that you come up with. It will tell you if the domain is available to purchase or not.
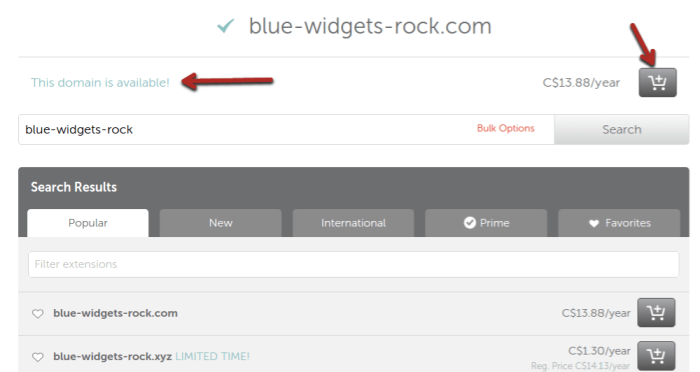
Note that you should try to avoid using hyphens in a domain name, even if the domain name registrar is trying to give you the deal of the century. If you’re brand new, take some time and review this list of domain name best practices.
One of the most highly rated domain registrars is Domain.com
Option #2 – Use a Tool
If you need a little spark in creativity, there are some great free domain name generators at your disposal.
Enter one or two keywords and the generator will look for ways to combine those words into a domain name. The really convenient part is that they also show you if the domain is available.
You can register a name through the link they provide (which will be an affiliate link to a domain name registrar), or just go to your favorite registrar and do it.
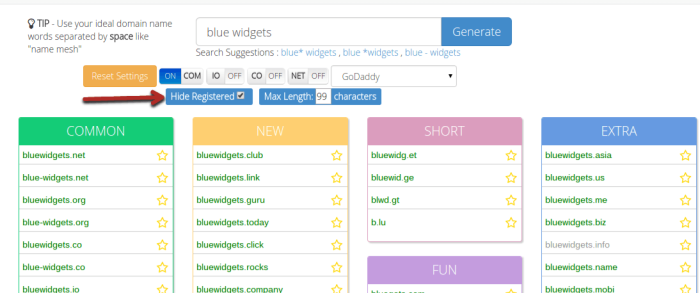
The first tool example I have is NameMesh. As the name suggests, it tries to mesh words together. If you check the “hide registered” button, you’ll only see domain names that are actually available.
Another good tool is Panabee. It works in the exact same way, but could give you different results. If there’s a blue heart next to the suggested domain name, it means that it is available for purchase.
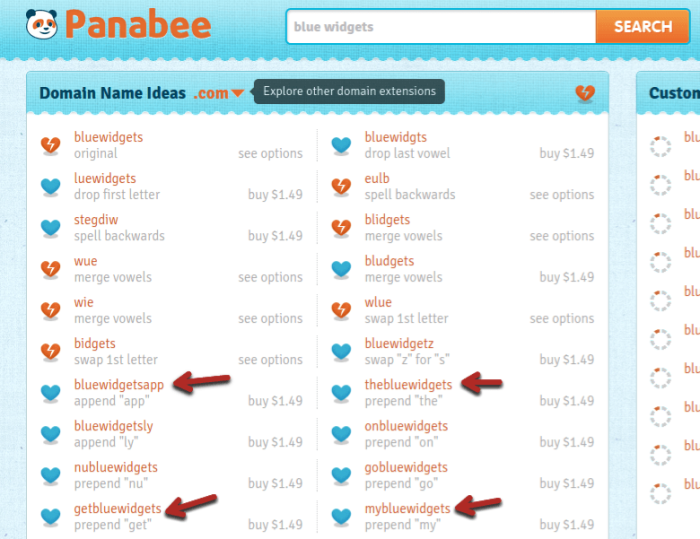
A critical number of the names will be silly, but you'll routinely get a relatively few that are entirely OK.
At whatever point you've picked a region name, you truly need to enroll it and thereafter guide your space name toward your working with account. This is really essential. Your working with association will send you an email ensuing to enrolling that will contain DNS servers (which take after web server addresses).
In the event that you Google "[name of region registrar] + DNS servers", you can routinely notice a help with detailing that will show you where to enter your space name inside your working with account.
Now and again, you might notice your leaned toward region name is blocked off. On the off chance that that happens, have a go at working up the words, or adding an activity word to the name.
Manufacture a Website Step 3: Choose a CMS
CMS addresses content organization system.
Remember that you store your site's records on your working with server. If that you really expected to, you could change these archives each time you expected to carry out an improvement to your business site.
Unmistakably, that is all things considered an exacerbation to do.
A CMS permits you to adjust your site from the genuine region. You can sign in to the space and thereafter adjust your arrangement, settings, and content, and make new posts and pages, consistently using site designs that are not hard to use.
All things considered: It makes making and reviving a site much less difficult and saves you an immense heap of time.
There's no optimal CMS. There are hundreds out there, some better than others. When in doubt, be that as it may, every one of the principle ones have different characteristics and deficiencies.
I'm working under the doubt that you're just endeavoring to get a to some degree fundamental webpage or blog good to go. In the event that you are, stick to one of the well known CMSs that I will chart. It will make your life altogether more clear.
In the event that you're endeavoring to make a custom web application or obfuscated instrument, you will require a custom course of action. Either help out a specialist for your assignment or enroll a progression firm.
It would be hard to show you, one small step at a time, how to present each of these on each web server, but you can find an informative exercise in the event that you Google or search on Youtube for:
"present [CMS name] [hosting company]"
Decision #: WordPress
WordPress is the leader of CMSs. It is by a long shot the most popular decision for this and it's straightforward business webpage formats and effortlessness of online media sharing.
Just to save from some confusion: WordPress.com is the outcast page where you can make free web diaries, but WordPress.org is where you can download the WordPress programming to present on a webpage.
WordPress rose to qualification as a wonderful composition for a blog stage. Accepting that you're fundamentally expecting to set up a blog-based website, it's an amazing decision.
It incorporates an astoundingly intuitive executive back end that makes changing the most central site design decisions, similarly as making new posts and pages, fundamental.
One locale that is both a strength and a weakness is modules.
WordPress has in excess of 57,000 modules in its library – it's monster.
This is adequate considering the way that it suggests that you can use modules to make WordPress do almost anything that you really want, including using electronic media to guide individuals to your business site.
Nevertheless, not all pieces of modules are adequate:
They can swell your site: It's fundamental to not go crazy with modules. If you have excessively, they will basically tone down your site.
They can be security perils: When modules are kept awake with the most recent, they're truly ensured. Regardless, since most modules are free, the producers as often as possible quit staying aware of them. As time goes on, they can become security risks and can provoke your site getting hacked.
They aren't seriously reviewed/attempted: Anyone can disperse a module for WordPress without underwriting. Along these lines, when you present a module, you face a test. A portion of the time you will revive a module and it will crash your entire site.
As a rule, modules are extraordinary to have when you really need them, but endeavor to restrict the quantity of you use. For extra, check out this video:
Option #2: Joomla
Right behind WordPress is Joomla. It’s not quite as intuitive but is still relatively simple.
Again, it’s fairly easy to create and edit posts and pages and you have some control over website settings.
Also, like WordPress, Joomla has a large (not quite the same scale) library of plugins. But again, these share the same limitations. They are not tested by anyone and often get outdated, leading to security risks.
Option #3: Drupal
Of these first three website building options, Drupal is the most advanced. It will be the hardest to learn, but it also allows you to customize more.
It’s a lot like Lego blocks, where you put together the pieces that you want (not easy for beginners).
Rather than modules, Drupal has modules. It isn't quite so large as both of the other options, yet there's a justification behind that. Drupal shows you which modules are under dynamic turn of events and are being kept up with. This goes far toward alleviating your business site security hazards.
I wouldn't actually suggest Drupal for an amateur, however if you realize you'll require some high level customization, it very well may be a choice to the extent a site layout.
Choice #4 – Rainmaker
The Rainmaker Platform isn't quite as famous as the initial three choices, however I needed to incorporate it. It was made by the masters at CopyBlogger, which is the way you know it's an excellent item.
The explanation I included it here as a choice is on the grounds that it's not just an exceptionally cleaned CMS, it's a CMS planned explicitly for Internet business visionaries.
Here are only a portion of the elements it gives:
Fabricate enrollment destinations, gatherings, and internet instructional classes
Transfer, oversee and sell advanced items like programming, digital books, and then some
Inherent examination and detailing
Underlying A/B Testing
Cloud-facilitated, with overhauls, upkeep, and security, all dealt with.
Commodity content to WordPress whenever you pick.
Those are some extremely extraordinary and helpful elements, taking care of issues that web advertisers regularly have, without finding a module or administration to utilize.
You'll see that numerous angles look like WordPress on the grounds that it depends on WordPress.
One constraint is with regards to topics (I'll carefully describe the situation in no time).
Rainmaker is restricted to Genesis subjects. There are as of now around 30 of them. If you like straightforwardness, this makes it simple to track down an appealing topic, so perhaps it's not actually a shortcoming.
When you pick a topic, it's genuinely easy to apply any custom CSS or configuration changes that you'd like:
One huge reward is that it upholds such countless substance types.
Rather than purchasing a point of arrival instrument or observe a decent podcasting stage, you can utilize the substance apparatuses gave. This assists with online media brand building.
At long last, you can screen traffic and do change rate advancement, solidly in the CMS. That is a staggering element done in a straightforward manner, which is extraordinary for amateurs.
The primary restriction is that assuming you need an element that isn't implicit, you're stuck between a rock and a hard place. There are no modules on the Rainmaker stage right now, so what you see is the thing that you get.
Build a Website Step 4: Choose Your Brand Identity

At this point, you have some sort of website up and running.
Now, we have to make it awesome.
For any major CMS, you’ll install a theme. Themes are built on the basic CMS but are customized to look and function differently. This allows themes to be built for different businesses: artists, entrepreneurs, podcasters, local businesses, etc.
I’m going to go over themes for the main 3 CMSs I outlined above. They all work virtually the same.
How to Find a Great WordPress Theme to Build a Website
You have a few different options when it comes to choosing a WordPress theme. The first option is to search within WordPress.
Go to “Appearance > Themes” in the side menu and then click “add new” at the top:
You can sort themes by “featured”, “popular,” or by any advanced “feature filter” that you’re looking for.
If you like the look of the theme’s thumbnail, click anywhere on it to bring up a preview window.
If you like the preview (on the right panel), click install. Otherwise, click the “X” button and you’ll go back to your search screen.
Once you install a theme, you need to activate it for it to light up on your website. You can do that directly from the successful installation screen. Or, go back to your main themes page and you’ll see your new theme as an option.
Click it like before, but this time there will be an “activate” option, as well as a “live preview” option if you’re not sure that you actually want to activate it.
The second option is to find a theme using a third party site. These are typically premium themes, so expect to pay $30-60 for a theme. You can find some great free themes, but the best ones are all premium options.
It’s a one-time fee and I recommend it if you’re serious about your business. You can always start off with a free theme and convert to premium later, though.
The most well-known marketplace is Themeforest, but, if you’d like to try others, just search for “WordPress themes” in Google.
What you’ll find, with Themeforest, is that there are a lot more options:
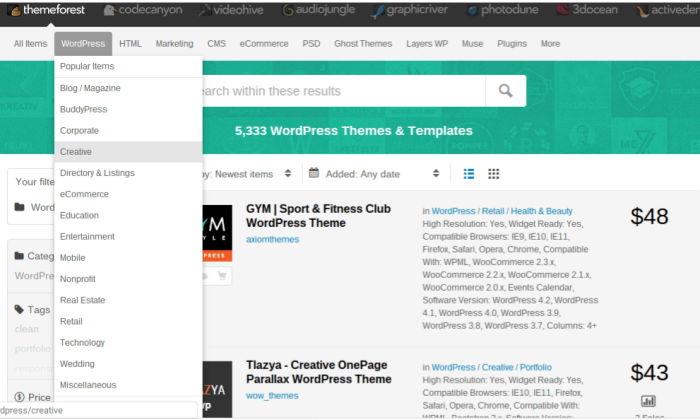
You can sort subjects by classification, tag, value, notoriety and that's only the tip of the iceberg. On the right, you'll see a cost for the subject, just as the measure of deals it has.
If you click on a topic, you can perceive any surveys, just as a review and more insights concerning the subject.
With an exceptional topic, in addition to the fact that you get better subjects as a rule, yet you likewise get support from the topic maker themselves, which can be extremely valuable to amateurs.
Construct a Website Using Drupal Themes
Drupal, as WordPress, has their own vault of topics. The thing that matters is that it's situated outside of the administrator board.
However, the internet searcher isn't exactly as cordial, however you actually have a respectable measure of topic choices (I wouldn't agree on par with WordPress):
There's no simple see, by and large, so you'll need to go into each subject and search for connections to documentation and demos.
In the event that you do observe one to be that you like, look down a little, under the introduction for the subject, to the downloads segment. Download perhaps the latest version.
Give exceptional consideration to the adaptation number. Adaptation 6 subjects won't deal with form 7 of Drupal as well as the other way around.
You'll have to transfer the subject into the topic registry in Drupal:
/destinations/all/topics/yourThemeName
Then, at that point, explore to "control > topics" and snap "empower" on the new subject. At last, you'll need to go to client inclinations and select the new subject.
In the event that it sounds troublesome, here's a short instructional exercise that tells you the best way to do it:

You can also buy premium themes for Drupal, which I highly recommend. They are much easier to search through, plus they typically look nicer as far as a website template. Again, you can use Themeforest or any other theme marketplace that you’d like.
Build a Website with a Joomla Theme
Joomla is a bit different, in that you’ll need to find a theme on a third party site. But, if you search for “free Joomla themes,” you can find many solid free options.
Alternatively, you can still use Themeforest, or any other premium marketplace.
The installation is pretty straight forward. You need to download the theme and then upload it to your CMS.
Watch the following video to see how to do it:

Build a Website Step 5: How to Edit your Website Without Messing Everything Up
I was a finished novice to everything web and being frightened that I would break a site. While it's not prone to occur in case you're cautious, it can occur.
One of the main strides to fabricate a site is to secure it by utilizing a youngster topic. A kid subject is commonly a template that is kept separate from the remainder of your topic's documents on the webserver.
You can enter CSS into a kid topic to alter the appearance of your site. There are 2 reasons you do this:
It's difficult to break your site – you can generally go into your facilitating and just eliminate the kid subject documents, if important.
It shields you from refreshes – in the event that you update a topic in WordPress (which is required frequently for security reasons), it will crash any progressions that you made in the subject documents themselves. A kid topic won't be impacted, so you don't need to sit around idly re-trying your changes.
Make a Child Theme in WordPress
The explanation that most locales are hacked is a result of obsolete programming. Taking into account how frequently WordPress, its subjects and its modules get obsolete, you want to consistently refresh everything, when conceivable on your web server.
A kid topic is a need in WordPress.
Making a kid topic includes making another CSS sheet (you can utilize a basic content tool) and adding fundamental topic data (check out the image beneath).
From that point, you without a doubt need to transfer it to WordPress (like some other subject) and enact it. Since there's no usefulness in your youngster topic, WordPress will continue to utilize the parent topic (as long as you recognize it effectively in the kid topic).
Here is a finished and basic manual for making a kid topic.
When you have a youngster subject, you can see it by exploring to "Appearance > Editor". You can add any custom CSS that you need and afterward click "save" for your progressions to produce results.
Make a Sub-Theme in Drupal
In the event that you go with Drupal, you can't make a "youngster" topic, however you can make a "sub-topic".
It's a similar idea. You can apply styles to sub-subjects, which will supersede the parent topic.
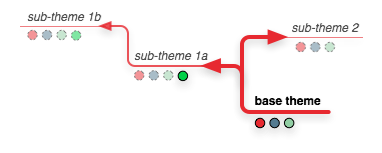
Here’s a complete guide to creating a Drupal sub-theme.
Create a Duplicate Theme in Joomla
You can’t create child themes in Joomla. The closet you can get is to create a duplicate theme.
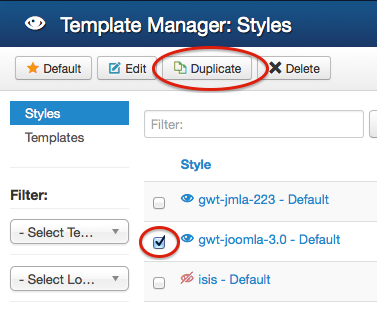
At the point when you click copy, it will make a precise of the first subject and become the default duplicate.
Note that this isn't as old as youngster topic, shockingly. Basically, you're making another copy topic, now and again, to fill in as a reinforcement, in the event that something turns out badly.
Stage 6 to Build a Website: Start Marketing Your Business
Now, you ought to have a site that works and looks good.
You can at last get done with the majority of the specialized piece of building a site and continue on to the things you initially needed to do.
While it will shift, contingent upon your undertaking or business, attempt to do the accompanying four things next.
Step #1: Get a logo
Marking yourself is significant. A logo is one of the primary ways that clients will perceive your business.
In the event that you have a business as of now, you might have a logo, which makes this simple. If not, you'll need to get one made. The following are one or two choices to track down planners:
Fiverr: You'll pay $5-20 to get a logo. You will not get an astonishing logo at that cost, yet it very well might be OK to kick you off.
Upwork: Post a task here and originators will apply to make your logo. Unfamiliar specialists are regularly extremely modest, while experienced Western fashioners could cost a couple hundred bucks. Once more, you get what you pay for.
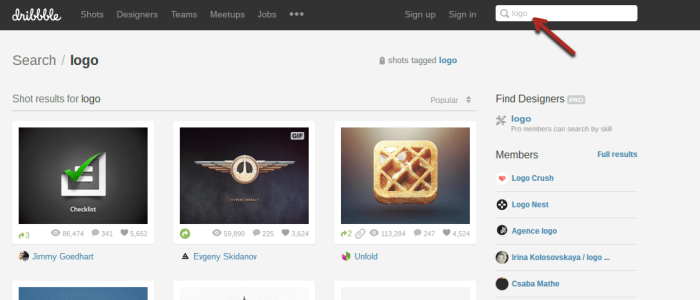
Dribbble: If you need a first rate logo, look for "logo" on Dribbble. Peruse the plans that surface, until you find a creator that you love. Get in touch with them and recruit them. This is the priciest of all choices.